Is your beam not long enough? Make a wood clamp from two planks.
This is a very basic method to make beams with a large span.
For use in construction of barns and sheds, and in emergency for use in any type of building.
The main disadvantage of this wood clamp are the estetics.
Apart from that it is not a very strong method for joinery.
Nobody can say that these wooden clamps are visually attractive.
But on the other hand they serve their purpose, make long beams to span a large width.
Therefore a wood clamp for elongating beams is mainly used in case that there is no other material or time available.
How to make long beams and planks, wood clamp the primitive way.
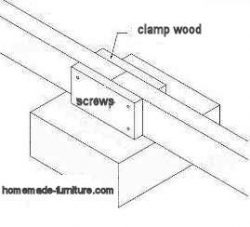
One plank on each side of the woodjoint, attached with screws or nuts with bolts.
A very fast way for connecting beams and planks.
Make sure that you use planks of sufficient length, this is otherwise not strong enough.
On this picture you can see that the minimal length for each wood clamp is related its thickness.
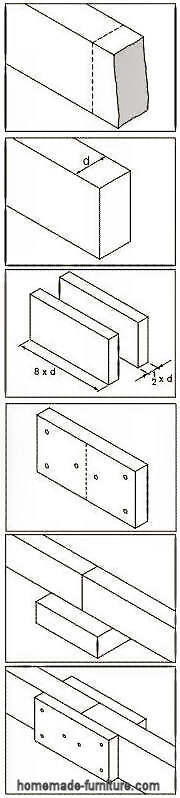
- As with any woodworking job you will have to start off with wood cut at a straight angle.
If you do not have a sawing machine to shorten it you’ll have to mark all sides first.
Use a sharp marker and draw the line all around the wood. - Measure how thick the wood is.
On his picture the thickness is marked with a D. - Now you have the startup number to calculate your wood clamp length.
The clamps should minimal be eight times D, - Draw a center line on each wood clamp.
You will have to drill several holes on both sides of this line.
These holes should be thinner then the screws that you will use, that is obvious. - Use wood glue on the short sides of the beams where they will contact.
Apply glue as well to the beams and the clamps where they will touch. - Line everything up, make sure that all is straight and touching.
Get some help to hold everything together or use some method to stabilize all parts. - Now it is time to screw through the wood clamps into the two parts, maybe even into the other clamp>
Obviously you will have to do so on both sides. - Longer clamps make a stronger woodjoint.
- You might add clamps above and below the woodjoint, that will obviously enhance the strength of this wood clamp.
See more techniques for woodworking.
More joinery methods for wood.
- Woodjoints with dowels.
- Mitre joints in several ways.
- Various ways to use a lapjoint in carpentry.


