A bridle joint is often used to make frames for furniture.

These woodjoints look very neat and they provide reasonable strength to the structure.
You will probably need a bit less wood when you use the bridle joint for your woodworking project.
This method for connecting wood is especially suitable when the combined pieces have to be shaped afterwards.
Since the woodjoint spans a large surface there will be less loss of integrity when material gets removed.
This is especially handy when you make furniture that requires rounded shapes and bends.
Table legs are often connected with these woodjoints.
Another application is the support frame under tabletops.
Combine the frame with a mitred tabletop.
See more methods to connect wood, woodjoints for beginners.
Dowels are the most popular woodjoints foor homemade furniture.
A similar method to the bridle joints but with a lot less strength is the wood lap joint.
Extra strong bridle joints with angled cuts.
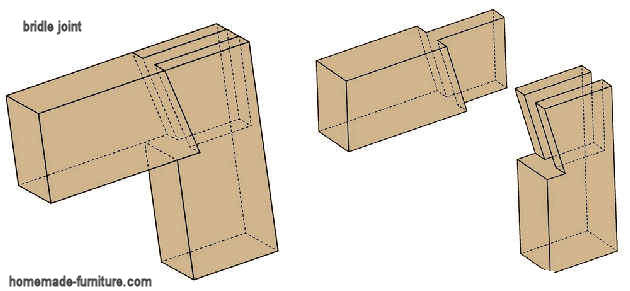
This bridle woodjoint allows for shaping of the frame.
On the pictures it becomes clear that you could round the sharp corner to a fair extent without much loss of integrity.
On the picture above it also becomes obvious that you could remove wood from the inside where both parts meet.

Some extra information about bridle joints on Wikipedia.

Woodjoints for furniture, step by step explained.
- Always start with timber that has straight edges.
You will most likely have to shorten all your timber in order to ensure those straight edges. - Make sure that you have all sizes of the lumber on paper.
Check again if unsure.
Measure the width B and thickness of the timber D. - Measuring and marking the outlines.
Decide which depth your woodjoint must be, this is usually the width from the piece you are going to connect.
Signal this depth by marking a line all around the wood. - Divide the previously marked piece D in three.
Pull these lines untill the end of your wood. - Take a good sawblade and cut two slits into the wood as shown on the right.
- With a chisel you can now remove the remaining bit from in between the slits.
Make all surfaces flat with a sharp chisel.
Alternatively you could have drilled a hole at the end of the slits, that makes removal easier.
Make sure that all angles are square. - Now you still have to make a tenon in the other part.
Proceed as in the previous steps, but now remove the wood on the outside.
Make all surfaces flat and well fitting together. - Apply wood glue to all parts.
Connect the parts together and apply pressure. - Improve the strength by inserting dowels if desired.
This will also make sure that your frame will not move while the glue is drying. - When the glue has dried you can start to remove leftovers that seeped out of the woodjoints.
This is easily done with a sharp chisel.
And finally it is now time for sanding and assembly of your homemade furniture.


More examples for wood joinery.


